
This blog shows an example of how to configure LDAP authentication for OBIEE 11g (11.1.1.6) using Active Directory. Configuring LDAP authenticaton is a complex process, so below simply shows the steps I went through - additional steps may be required, espeically if using an LDAP other than AD.
Rather then modify the existing default 'myrealm' security realm in Weblogic, these instructions show the setting up of a new realm - this enables the original realm to be reinstated easily should problems occur. Hence why this is a somewhat lengthy posting.
http://paulcannon-bi.blogspot.in/2012/07/configuring-ldap-authentication-for.html

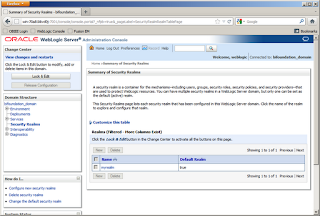

Click on the new Realm name.
In the settings screen, click on the Providers tab then the Authentication sub-tab


You can now see this new provider. Click on the provider name to edit its settings.


In the Common tab, check the ‘Current Builder’ check box. Click Save.

The basic configuration of the new realm is now complete.

Click the Activate Changes button in the top left corner.
If successful this returns the following message:

We now need to restart the weblogic service. Logout of the console and perform a full shutdown and restart of OBIEE and Weblogic.
Click on the Security Realm link in the Domain Structure window again.

Click the Lock & Edit button again.

Now click on the Providers tab, then the Authentication sub-tab.

Click the New button again.

In the provider Specific tab enter the following details, adjusting them to suite your environment.
We now need to change the order so that the MSAD_Provider is first in the list. Click the Reorder button.

Check the MSAD_Provider option and click the icon to put it top. Then click Ok.

The new Security Realm is now setup, but before we activate it we need to check it is working correctly.
Once complete, log back into the console.

Click on ‘Customize this table’. In the Filter window that opens up, enter the name of a user in the Criteria
field and click apply.

The user you entered should now appear in the user list. If it does not then something is not right with the new provider details.

Return to the Providers tab, click on the MSAD_Provider, then the Provider Specific sub-tab and recheck all of the details, especially the User Base DN, Group Base DN and Principal & Credential fields. You will then need to restart weblogic again and perform this test again before continuing.

Login into the Fusion Enterprise Manager:

Expand the Weblogic Domain, the right click on bifoundation_domain, select Security -> Security Provider Configuration


Name: username.attr value: cn

Click on BIAdministrator and then click the Edit icon.

Rather then modify the existing default 'myrealm' security realm in Weblogic, these instructions show the setting up of a new realm - this enables the original realm to be reinstated easily should problems occur. Hence why this is a somewhat lengthy posting.
http://paulcannon-bi.blogspot.in/2012/07/configuring-ldap-authentication-for.html
Login into the weblogic console

Click on Security Realms in the Domain Structure panel on the left hand side

We do not want to alter the default ‘myrealm’ security realm as this is our back-out route should anything go wrong – as we are dealing with security a mistake could prevent the weblogic user from being able to login, so we’ll retain the ability to revert back to the default realm.
Before we can make changes we have to lock the session. Click the Lock & Edit button in the top left corner:

In the Realms list, the New button is now available, so click it.


In the Create a New Realm screen enter a name for the Realm, leave the ‘Ignore Deploy Credential Mapping’ check box un-ticked and click ok.


This may generate some errors because the new Realm isn’t setup properly. If you get these, click the Cancel button and the Realm will still be created.


The first thing we need to do is setup the new Realm in exactly the same way as the default ‘myrealm’. Unfortunately there isn’t a copy option.
Click on the new Realm name.
In the settings screen, click on the Providers tab then the Authentication sub-tab

Under Application Providers, click ‘New’:


Enter the name of DefaultAuthenticator (must match exact case and spelling) and select the type DefaultAuthenticator from the drop down box. Click Ok.

You can now see this new provider. Click on the provider name to edit its settings.

In the common tab, change the Control Flag to REQUIRED. Click save.

In the Provider Specific tab, check the ‘Use Retrieved User Name As Principal’, leave the other check boxes unchecked and set the final three options to 8, unlimited and 0 respectively. Click Save.

In the Provider Specific tab, check the ‘Use Retrieved User Name As Principal’, leave the other check boxes unchecked and set the final three options to 8, unlimited and 0 respectively. Click Save.

To return to the Providers list, click the ‘Providers’ link in the breadcrumb trail at the top of the screen:

Now click New again.


This time enter the name DefaultIdentityAsserter (must match exact case and spelling) and select DefaultIdentityAsserter from the drop down list. Click Ok.


Now click on DefaultIdentityAsserter.


In the common tab select the Authenticateduser option from the list of Active Types and click the  icon to move it to the chosen window. Click Save.


Now click the ‘providers’ list in the breadcrumb trail again.

Now still under the Providers tab, click the Password Validation sub-tab


Click New.


Enter the name of SystemPasswordValidator (must match exact case and spelling) and select the type SystemPasswordValidator from the drop down box. Click Ok.


Now click on the SystemPasswordValidator to edit its settings.
Go to the Provider Specific tab and change the minimum password length to 8. The other settings in this screen all relate to the contents of passwords and can be left at the default values unless you want to alter them to specific values.
Click Save.

Now click the ‘providers’ list in the breadcrumb trail again. Then select the Authorization sub-tab:

Click New.


Enter the name of XACMLAuthorizer (must match exact case and spelling) and select the type XACMLAuthorizer from the drop down box. Click Ok.
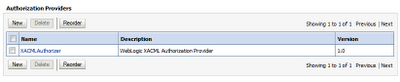
There are no configuration settings required for the Authorization Provider.

There are no configuration settings required for the Authorization Provider.
Now select the Adjudication sub-tab.


Click New.

Enter the name of DefaultAdjudicator (must match exact case and spelling) and select the type DefaultAdjudicator from the drop down box. Click Ok.

There are no configuration settings required for the Adjudication Provider.

There are no configuration settings required for the Adjudication Provider.
Now select the Role Mapping sub-tab.


Click New.


Enter the name of XACMLRoleMapper (must match exact case and spelling) and select the type XACMLRoleMapper from the drop down box. Click Ok.

There are no configuration settings required for the Role Mapping Provider.

There are no configuration settings required for the Role Mapping Provider.
Now select the Credential Mapping sub-tab.


Click New.

Enter the name of DefaultCredentialMapper (must match exact case and spelling) and select the type DefaultCredentialMapper from the drop down box. Click Ok.

There are no configuration settings required for the Credential Mapping Provider.

There are no configuration settings required for the Credential Mapping Provider.
Now select the Certification Path sub-tab.

Click New.

Select WebLogicCertPathProvider from the drop down pick-list. Click Next.


Click New.

Select WebLogicCertPathProvider from the drop down pick-list. Click Next.

Enter WebLogicCertPathProvider as the name of the provider. Click Next.

Leave the ‘Replace Existing Builder’ as unchecked. Click Finish.

Now click on the WebLogicCertPathProvider to edit its settings.

Leave the ‘Replace Existing Builder’ as unchecked. Click Finish.

Now click on the WebLogicCertPathProvider to edit its settings.
In the Common tab, check the ‘Current Builder’ check box. Click Save.

Now click the ‘providers’ list in the breadcrumb trail again.
The basic configuration of the new realm is now complete.

Click the Activate Changes button in the top left corner.
If successful this returns the following message:

We now need to restart the weblogic service. Logout of the console and perform a full shutdown and restart of OBIEE and Weblogic.
Then log back into the Weblogic Console.
We now have a duplicate realm setup, but there are no users in it. Later on we’ll be setting up a third provider to connect to the Active Directory server, but before then there are a few internal users required.
These however can be copied from the default ‘myrealm’ realm.
These however can be copied from the default ‘myrealm’ realm.
Click on the Security Realm link in the Domain Structure window again.

Click on myrealm.
Click on the Migration tab, then the Export sub-tab. Create a directory to store the realm export files, enter it into the ‘Export Directory on Server:’ field and check the ‘Overwrite’ option .

Click Save to perform the export.

Click Save to perform the export.
This creates a number of files in the export directory:

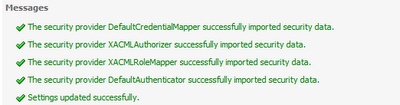
Now click on the Security Realms link in the Domain Structure window again. This time click on the new LDAP_Realm. Again go to the Migration tab, but this time select the Import sub-tab.

Enter the export directory path again and click Save. You should see the following messages:
We are now ready to create the Authentication Provider to connect to the Active Directory server.

Now click on the Security Realms link in the Domain Structure window again. This time click on the new LDAP_Realm. Again go to the Migration tab, but this time select the Import sub-tab.

Enter the export directory path again and click Save. You should see the following messages:

We are now ready to create the Authentication Provider to connect to the Active Directory server.
Click the Lock & Edit button again.
Now click on the Providers tab, then the Authentication sub-tab.

Click the New button again.

Enter a name for the Provider, e.g. MSAD_Provider and select the appropriate LDAP Authenticator, in this case ActiveDirectoryAuthenticator, from the drop down list.
Click Ok.

Click on MSAD_Provider to edit its details.

In the Common tab, change the Control Flag to SUFFICIENT. Click Save.

Click on MSAD_Provider to edit its details.

In the Common tab, change the Control Flag to SUFFICIENT. Click Save.
In the provider Specific tab enter the following details, adjusting them to suite your environment.
Field
|
Value
|
Host
|
localhost
|
Port
|
389
|
Principal
|
CN=Administrator,CN=Users,DC=obiee,DC=local,DC=com
|
Credential & Confirm Credential
|
Enter the password for the Administrator user in Active Directory.
|
SSLEnabled
|
No
|
User Base DN
|
CN=Users,DC=obiee,DC=local,DC=com
|
All Users Filter
|
(|(memberOf=CN=Users,DC=obiee,DC=local,DC=com))
|
User From Name Filter
|
(&(uid=%u)(objectclass=user))
|
User Search Scope
|
subtree
|
User Name Attribute
|
cn
|
User Object Class
|
User
|
Use Retrieved User Name as Principal
|
No
|
Group Base DN
|
CN=Users,DC=obiee,DC=local,DC=com
|
All Groups Filter
|
(&(uid=*)
|
Group From Name Filter
|
(&(cn=%g)(objectclass=group))
|
Group Search Scope
|
subtree
|
Group Membership Searching
|
unlimited
|
Max Group Membership Search Level
|
0
|
Ignore Duplicate Membership
|
No
|
Static Group Name Attribute
|
cn
|
Static Group Object Class
|
group
|
Static Member DN Attribute
|
member
|
Static Group DNs from Member DN Filter
|
(&(member=%M)(objectclass=group))
|
Dynamic Group Name Attribute
|
Leave blank
|
Dynamic Group Object Class
|
Leave blank
|
Dynamic Member URL Attribute
|
Leave blank
|
User Dynamic Group DN Attribute
|
Leave blank
|
Connection Pool Size
|
6
|
Connect Timeout
|
0
|
Connection Retry Limit
|
1
|
Parallel Connect Delay
|
0
|
Results Time Limit
|
0
|
Keep Alive Enabled
|
No
|
Follow Referrals
|
Yes
|
Bind Anonymously On Referrals
|
No
|
Propagate Cause For Login Exception
|
No
|
Cache Enabled
|
yes
|
Cache Size
|
32
|
Cache TTL
|
60
|
GUID Attribute
|
Objectguid
|
Note: If you don’t know the DN details for your users and groups, with Active directory you can discover these using the dsquery command from a command prompt.


When complete, Click Save. Return to the Providers list.


When complete, Click Save. Return to the Providers list.

We now need to change the order so that the MSAD_Provider is first in the list. Click the Reorder button.

Check the MSAD_Provider option and click the icon to put it top. Then click Ok.

The new Security Realm is now setup, but before we activate it we need to check it is working correctly.
Click the Activate Changes button to save all recent changes, then logout of the console and perform a full restart of Weblogic and OBIEE again.
Once complete, log back into the console.

Click on ‘Customize this table’. In the Filter window that opens up, enter the name of a user in the Criteria
field and click apply.

The user you entered should now appear in the user list. If it does not then something is not right with the new provider details.

Return to the Providers tab, click on the MSAD_Provider, then the Provider Specific sub-tab and recheck all of the details, especially the User Base DN, Group Base DN and Principal & Credential fields. You will then need to restart weblogic again and perform this test again before continuing.
If the configuration is correct you will see the user and note that the Provider of the user MSAD_Provider.
You can use wild cards to see users, e.g. entering the Criteria of p* returns:

If you click on one of the users you see which groups they belong to, also picked up from the LDAP:

You can use wild cards to see users, e.g. entering the Criteria of p* returns:

If you click on one of the users you see which groups they belong to, also picked up from the LDAP:

Similarly you can view the Groups being picked up from the LDAP:

If all is correct we now need to configure the domain to make this new realm the default one for Weblogic.
First click the Lock & Edit button. Then In the Domain Structure panel, click on the bifoundation_domain link.

Go to the Security tab and change the Default Realm option to Realm. Then click Save.

Click the Activate Changes button again, then logout of the console and perform a full restart of Weblogic and OBIEE again.
Go to the Security tab and change the Default Realm option to Realm. Then click Save.

Click the Activate Changes button again, then logout of the console and perform a full restart of Weblogic and OBIEE again.
Now that Weblogic is configured to allow authentication to Active Directory, OBIEE itself needs to be instructed to tell weblogic to use it.
Login into the Fusion Enterprise Manager:

Expand the Weblogic Domain, the right click on bifoundation_domain, select Security -> Security Provider Configuration

If the Identity Security Store section is compressed, click the + icon to expand it:


Then click on Configure.


Click the Add icon.
For the new property enter the name of user.login.attr and the value of cn. Click ok.


Repeat this to add two more properties:
Name: username.attr value: cn
Name: virtualize value: true
Note, if the LDAP does not have a GUID (Global User ID field), then OBIEE need to be altered to use a different field as the unique identifier. This is done by adding a fourth field into this screen:
Name: PROPERTY_ATTRIBUTE_MAPPING value: GUID=cn
The value is the entire string 'GUID=cn', where cn is the alternative attribute in the LDAP - it can be any field, not just cn, however usually cn is the user-name and hence will be unique if no other specifically unique field exists.

The final step is to give users permission to login.
From the menu in the left hand pane expand Business Intelligence and select coreapplication.

From the Business Intelligence Instance menu select Security -> Application Roles


From the Business Intelligence Instance menu select Security -> Application Roles


Normally at this point you would assign the Active Directory groups to the BI Roles in this screen. For now however we are simply going to allow any authenticated user to login as an Administrator.
Click on BIAdministrator and then click the Edit icon.

Click the Add icon.


Leave the type as Application Role and just click the go icon. When the list of roles appears, select ‘authenticated-role’ and click OK.

Back in the Edit Application Role screen click OK to save the change.

Back in the Edit Application Role screen click OK to save the change.
Finally perform a full restart of Weblogic and OBIEE again.
You should be able to login to OBIEE with an LDAP user-id and password.
No comments:
Post a Comment